We used to freeze items by wrapping them in freezer paper or plastic containers. It turns out that created a lot of bad outcomes. Those outcomes included freezer-burned food, post-freeze-off textures, and lost items. Freezing food for good outcomes is actually not complicated but it takes a bit of extra care in the process. We will talk about some of our learnings around freezings in this post to provide actionable tips for improved freezing results.
Note: Products, services, and suppliers shown or linked to in this post are for example purposes only. They are not a direct endorsement of them, their brand, or the seller.
First A Cold Background
TL; DR Warning: The first half of this post discusses the history and mechanics of consumer freezing. If you are here for the tips and traps feel free to scroll down further.
Freezing food as a preservation method has not been around for a long time for humans. Yes, of course, there were ice houses and local climate-specific places that had it but for us as a people en masse, not so much. Freezing as we know it today wasn’t something on the consumer’s radar until Clarence Birdseye’s process of flash freezing intersected with the advent of electric freezers. Even then, it was hard to establish a consumer market for multiple reasons.
Birdseye’s work was key to unlocking how to freeze food to have it be palatable when it was thawed. What Birdseye perfected was the process of flash freezing at very low temperatures. Flash freezing minimizes the growth of ice crystals. Ice crystals, and their growth, are what make food mushy and watery when thawed. Minimizing their growth is key to freezing with minimal damage.
The Mechanics of it All
We all know water freezes at 32℉ or 0℃. It is through the transition of the state from liquid to solid that ice crystals appear. The more water in the food and the longer the time to a solid state, the more likely the damage to the items frozen. When we are freezing non-liquids, they freeze from the outside in. This means the larger the volume of the item to freeze, the longer the journey to freeze. One nuance of freezing to be aware of is that liquids freeze from the top down not just outside in.
What most of us don’t realize is food is only partially water. If you freeze a steak the water in it freezes at 32℉. What about the meat fibers themselves? It takes a temperature of 26℉-28℉ degrees to start freezing meat fibers. It’s not just meat that has these challenges. Sugars, alcohol, and fats all impact the freezing point of an item.
Knowledge Is Power
Ready to throw up your hands and walk away never to freeze again? Let’s talk about how to handle these pesky problems. Rather than say what won’t work, let’s set out two axioms to help us. We can use these as a guide as to what can freeze well and how to freeze it with the best quality:
Axiom One: The faster the transition from cold to frozen the smaller the ice crystal development in both size and number.
Axiom Two: Due to the nature of freezing from outside to inside, the smaller the volume of an item, the faster it can be frozen.
We now have rules we can use to our advantage! Before we put them to use, let’s do a fridge and freezer tune-up. Most experts will agree the right temperature for a Freezer is 0℉. Fridges have a bit more discrepancy from 35℉ to under 40℉ as 40℉ and above put us in the zone. The reality is neither a freezer nor a fridge maintains a perfectly consistent temperature.
Machines and Guidance Aren’t Perfect
Both appliances cycle off and on so they may be slightly higher or lower than the set temperature at any one time by a couple of degrees. We also know the shorter the trip from fridge to frozen, the better quality we have. While we like roughly 35℉ degrees, you will have to determine what is right for your needs. We know this can be lower than the USDA recommendation however, we rather err on the side of cold to help us shorten the trip from fridge to frozen.
In terms of temperature, don’t trust the 1-5 rating numbers or cold/colder/coldest settings on most fridges and freezers. It is best to purchase a thermometer for each unit that shows what the temperature is set to. When you stop and think about it, in a fridge the difference between frozen water and the danger zone is only 7 degrees. While freezers are more forgiving, they too are imperfect machines. Time above 0 may lead to damaged food due to ice crystal growth and conditions such as freezer burn. Pro-tip as well; batteries have no love of cold. This is why we chose mechanical.

Ready to freeze, let’s talk Tips and Traps
Tips:
- When possible remove all surface air contact by vacuum sealing the item.
- Always cool items in the fridge before freezing. Since heat rises, the coldest part of the fridge is always the bottom. Use this to your advantage by placing your items as low as possible.
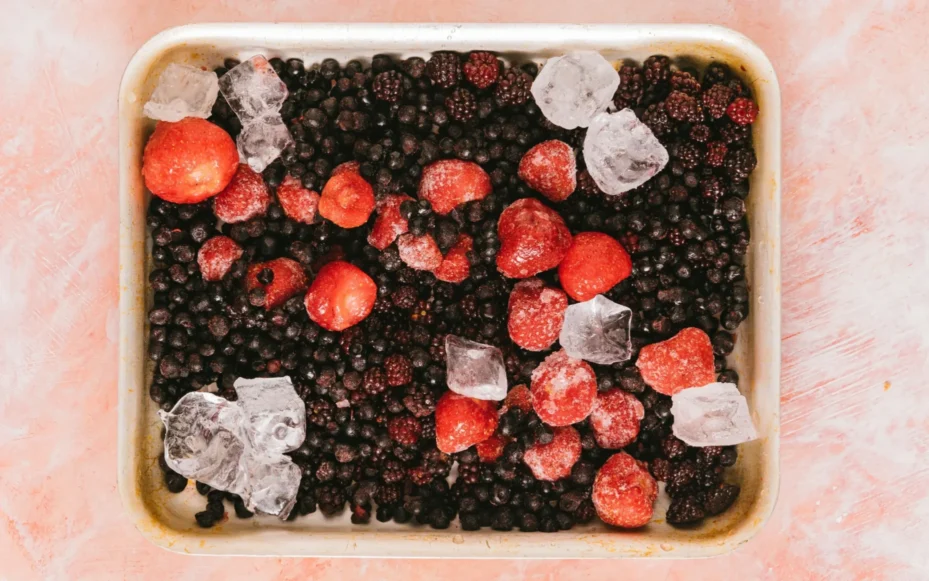
- Metal is more conductive than other materials. Use this to your advantage by placing items on parchment or wax paper on a cookie or half-sheet pan to freeze them.
- The thinner and flatter you can make an item, the faster it will freeze. A bowl full of berries won’t freeze as quickly as having them on a cookie sheet.
- Pre-freeze items (2-24 hours max) that contain a lot of water or have soft structures such as raw fish, berries, and vegetables before vacuum sealing. This pre-freeze allows the soft structures to harden so they can handle the vacuum pressures.
- Items that are mostly liquid we don’t care about textures such as mashed potatoes, soups, and creamed vegetables, are fine in BPA-free plastic containers.
- Label everything keep a list of numbers of items and be militant about it. When 30 items are in the same type of containers it gets problematic to know what is in what.
- For really odd shapes and raw meats, you can remove air by freezing it submerged in water. You can place an item in a zip lock bag, add water to it, and bleed the air out through a coffee stir straw. During the cooling and freezing process, it is best to have it in a bowl or baking pan in case of leaks.
Traps:
- When you freeze sauces or gravies, freeze them in separate containers from their entrees. Freezing sauces can ‘break’ them. When a sauce is thawed it will need to be mixed back together again. This is why we recommend freezing them separately from their intended target food.
- Vacuum-sealed mason jars will not provide the same protection a vacuum-sealed bag will. Only use them for short-term storage.
- When using mason jars with shoulders are prone to breakage in freezers due to expansion of fluids when frozen. If you are going to freeze something in a mason jar, only use the ones with straight sides.
- Don’t freeze items that are larger than you will use when thawed. If you have a pack of 20 hotdogs, and you thaw it out, you need to have plans for 20 hotdogs as refreezing will further degrade them.
- Resealable bags of items like fries and tater-tots from the grocery stores -aren’t- resealable. Reclosing the bag with the zipper without the air being removed can result in freezer burn no matter how ‘re-sealable’ the bag claims to be.
- Freezer paper isn’t. The freezer paper will not keep air out. It is fine for short-term storage but doesn’t hold up for our longer-term needs.
Wrapping Up
We have talked a lot in this post about the history and mechanics of freezing as a preservation method. Like many things, freezing isn’t complicated but it does have gotchas. Our tips and traps section lays out some common scenarios, how to handle them, and what is not going to work. These were lessons learned by us over time. We hope they help others avoid some of the problems we ran into on our journey.