Previously we talked about how to store items to keep them from going bad (not spoilage which are different terms to us). As we learned more we found vacuum sealing to be helpful for all types of storage. Not all vacuum sealing means putting something in a plastic bag and sucking the air out of it. This post will explore different methods of vacuum sealing beyond the basics.
Note: Products, services, and suppliers shown or linked to in this post are for example purposes only. They are not a direct endorsement of them, their brand, or the seller.
It’s Just About Freezing
If you have ever tried to vacuum seal rare roast beef or raw fish, you know it is not simple. What about preserving brown sugar in high-humidity environments where it wants to clump? Did you know you can preserve those kale chips you dehydrated a bit longer through vacuum sealing? Admittedly, not everyone loves kale chips, but it is no different from dealing with homemade crackers or potato chips.
Before we get too deep let’s set the context that we are talking about what can be done at home with an average or slightly above-average machine. We are not talking about commercial processing or long-term storage. Those types of vacuum sealing require special knowledge, and different tools, and have different purposes like extending shelf life for years not a couple of months. That doesn’t work with our 1-year max timeline discussed here.
Also, we know there are fans of Sous Vide and marination via vacuum sealing and vacuum tumbling. Those are both cooking and processing methods, not preservation methods. We won’t be discussing them here.
What Exactly Is Vacuum Sealing?
What does vacuum sealing do? Vacuum sealing does two things:
- Removes air and reduces humidity carried by the air in a container. This is what happens in containers such as mason jars, vacuum containers, and bags.
- Reduces the surface air contact for the food which only occurs in vacuum bags.
Vacuum sealers do not remove 100% of the air or moisture from an item. For this reason, considered a life extender and not a preservation method like canning. Much of the reason they can’t remove all the air is because foods are not simple shapes, hard enough, or dry enough. While there are ways of adding oxygen absorbers and using Mylar for preservation, that is another post.
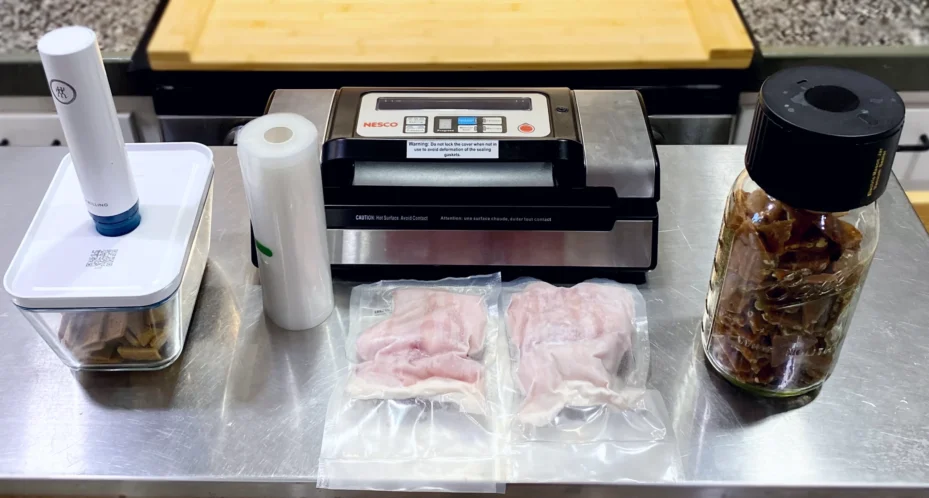
We Categorize This Into 4 Types
There are 4 main types of vacuum sealing methods available to us. Each has a different purpose and targets something specific. We assert while there is some overlap, it is better to focus on learning each before trying to use hybrids.
What are and Tips for the Big Four:
- Pre-cut or self-made vacuum bags are what many of us are familiar with when we first use a vacuum sealer. The purpose is to remove all air and create an air-free barrier around the food. Biggest tip here is that the rough side of the bags, if it only has one, should always be the side placed in contact with the sealing element.
- Items stored for long periods that will be opened over and over again are perfect for air-lock vacuum bags. We find these best for things that we want to keep moisture away from once the original package has been opened such as storing desiccants or oxygen absorbers. People do use them for liquids for marinades. For a lot less money a gallon bag and a disposable coffee stirrer can create the same effect.
- Mason jars are our go-to hard-sided storage for storing items like sugar, dried herbs, and homemade chips. They are best for items that are fragile and would be crushed by vacuum bags. You use a vacuum sealer for the mason jar. An important distinction we make is we are not advocating dry canning. Dry canning is similar in process to vacuum sealing a mason jar but with the addition of heat that some errantly believe to be the equivalent of preservation-like canning.
- Vacuum containers with built-in air-locks. These are similar in purpose to mason jars however ever can have different shapes to accommodate different types of foods that mason jars can’t. Empirically we have only found glass containers to work well. Plastic containers have either leaked or broken so we have stopped using them.

Done with Simple, now the Nuances
All fairly simple techniques are used to extend the life of both shelf-stable foods and help slow the onset of freezer burn. Vacuum bags, however, are not as simple as they sound. They also allow for some of the more advanced tricks to make them much more flexible in usage. The specific callouts are:
- Standard vacuum and seal which needs no explaining.
- Handling wet items such as raw fish and cooked rare meat.
- Sealing items that crush easily when not frozen such as bread or fried chicken.
Let’s talk about the last two before we get into some additional tips. The amount of moisture in something directly affects how easy it is to vacuum seal it. Moist items like lunch meat take very little additional prep work. Raw meat, fish, and even rare meat can contain too much liquid to properly vacuum seal. As an aside, the wet setting on a vacuum sealer isn’t always going to help. The setting creates more heat for the sealer, however, it is not always enough when foods are very moist.
Handling the Moist and Wet
When vacuum sealing items with moisture the vacuum sealer may not be able to pull down the vacuum level far enough to trigger a sealing cycle. Here are two easy ways to handle that.
- When dealing with light moisture, roll up a piece of paper towel and create a dam between the food and sealer. This will help stop the flow of liquids allowed into the machine.
- Pre-freeze for an hour or so when you have high moisture content, such as raw fish or rare meat. You do not want to leave the food in the freezer long enough to freeze, however a light freeze will trap the moisture. Simply place the food on a silicone mat, wax paper, or parchment on a half-sheet pan (or cookie sheet) and allow it to freeze for a little bit. Using the dam technique plus pre-freezing will help limit the moisture.

One More Vacuum Tip
Crushable items (bread, fried chicken, rolls) take a bit more processing but are similar to sealing wet items. These items require pre-freezing longer until they are fully frozen. But won’t this risk freezer burn? This will not happen in low-moisture leftovers and items such as bread. Once fully frozen, they can be vacuumed and sealed however, sealing should be done via manual or pulse sealing if possible.
Storage Precaution
One of the biggest issues we have run into is gasket damage. Vacuum sealing machines use soft gaskets to seal around the bags. It takes very little to damage those gaskets. It is maddening to pull out a machine that worked fine 3 months ago only to find out it is now no longer creating vacuum pressure. Two Tips here:
- When you clean your machine, gently swap down the gaskets with bleach and water mixture or remove them and wash them -if- removable. Dry them before putting them back and gently press them back in place.
- Never store the machine in a locked position. Over time, this can crush the gaskets enough to stop them from sealing.
- Remove any fluid or material from vacuum holes in the machine so they don’t clog.
- Make sure the heating element is cleaned as well to help extend its life.
Wrapping Up
In this post, we have discussed vacuum sealing and some of the nuances of it. We have given you some tips and information to help your sealing go better. While not a perfect preservation method, you can effectively produce food and stock it in the same way your grocery store does. In our experience, we have found nothing that says vacuum-sealing victory like having a mess of homemade biscuits and fried chicken in the freezer ready to be reheated when the need arises. We hope you will find the same to be true for you.